|
|
Post by 238 on Nov 4, 2018 22:07:40 GMT -5
Having trouble with receive. The voltage checks close, except pin 2 it shows 13 volts. It should be 1.75v. Changed R58 it was bad. I did not have a cap {c67} to change out. I will get one, but will get one. Almost forgot its the V10 6AQ5 tube. 238
|
|
|
|
Post by 2600 on Nov 4, 2018 23:59:37 GMT -5
Not sure where you get 1.75 Volts for pin 2 of V10, the 6AQ5 tube. Should show 10 Volts. That's what this schematic shows at www.cbtricks.com/radios/browning/golden_eagle_mark_3/graphics/browning_golden_eagle_mark_3_rx_sch.jpgR58 always goes bad. We always replace it with a new 2-Watt part without testing the old one first. The original part is too old to trust, no matter how shiny and pretty it may look. Have a look at R56. It's a 2.2k half-Watt part that gets hot and appears dark around the middle when a large ping cap is installed. We also replace R56 in every Mark 3 receiver, with a 2.2k 2-Watt part. The original one is just a bad idea to leave in the radio. You should have weak, tinny-sounding receiver audio with C67 removed. If not, there's an additional problem. 73 |
|
|
|
Post by 238 on Nov 5, 2018 7:51:55 GMT -5
The 1.75v came out of Sams #79. I changed R58 & V10 & V8. The receive is working now. Should i change C67? I am going to run it some an see if it keeps working ok. Thanks 238
|
|
|
|
Post by 2600 on Nov 6, 2018 0:12:08 GMT -5
C67 should definitely get replaced. Even if it works today. Every electrolytic cap in the radio should get replaced. They're never meant to last 40-plus years. If you use the radio, they will fail one or two at a time. If you change them before they fail, this reduces the collateral damage any of them might cause. A shorted capacitor can overload other parts in a circuit.
73
|
|
|
|
Post by 238 on Nov 8, 2018 0:13:49 GMT -5
The MKlll receiver seems to been ok for now. Now i am trying to fix the transmitter. I am pretty sure someone has jumped the AM/SSB switch in it, but when i key it sparks fly around the switch. This belongs to a friend that's on disability so all the work i do free. I just try to keep our old tube stuff running. He had bought a used switch, if he can find it. I had to jump the one on my MKll, but it was easy. Any help would be operated. 238
|
|
|
|
Post by 2600 on Nov 8, 2018 1:21:45 GMT -5
The Mark 3 mode selector is a problem. Unless the radio was used around high humidity, it nearly always lasted 20 years or more. Trouble is, the newest Mark 3 is 42 years old. The oldest ones are more like 48. It's a question of when that part will break down, not a question of "if". Each of the two contact decks has 5 separate circuits on it. Makes it necessary to place contacts on both sides of the insulating ring. This puts them pretty close together, with high voltages on a contact that's right next to a circuit that feeds the meter, for example. Most-common spot to break down and turn the brown plastic black is between the meter circuit and the high voltage to the mike circuit. This will cause the meter to peg hard to the right when the meter knob is set to "Mod", even before you key the mike. Eventually the coil in the meter burns out. If R51 is dark or burned, this failure has already begun. If you see this, check the meter before you plug in the power cord. If it's still good, unhook one wire from the meter. It's the only way to protect it until this fault is fixed. 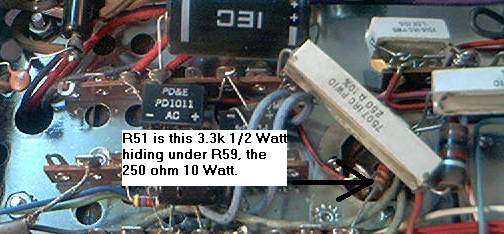 Other circuits that break down will blow out the carrier-balance pot R4 and the diodes inside the balanced-modulator can T1. Naturally, restoring both AM and SSB modes in a radio with this breakdown gets expensive, even if you can disassemble T1 and replace the blown diodes inside. If the winding inside T1 is cooked, the whole can has to be replaced. Making it work on SSB like it should often also requires replacement of one or more of the two sets of three 5 MHz crystals. They drift with age. If you spend all that money to make sideband work again, it won't work right with one or more drifted carrier crystals. The mode switch itself is expensive. Fortunately you can't buy the brown-plastic original. The only replacement on the market for years has ceramic insulator rings. Won't break down if you keep it clean. But it's expensive. Obsolete parts that are still being made are never cheap. And getting all 30 (or so) wires where they belong takes a lot of labor. And getting one or two of them wrong could be expensive, too. All this adds up to a big incentive to just "hot wire" the connections directly to make the AM mode work again. In a practical sense, the sideband transmit modes would never get used even if you do fix them. The Mark 3 SSB transmit is okay, but the receiver is a challenge to operate on sideband, and just not quite stable enough. More like playing a violin than tuning in a sideband signal. I started to put together a "how to" with pictures for the hot-wire solution. Problem is, when they revised the design after the first few years, stuff got moved around inside. Just enough to make a step-by-step with details like wire colors to be wrong for one version, and right only for the other. To write it up in that level of detail would require two procedures, one for each. Never worked up the motivation to complete the project. It would have cost Browning a buck or two more to use the white-ceramic switch in the transmitter. But they used the cheaper one. Which version of the transmitter do you have? Does it have the ALC adjustment pot sticking up out of the chassis between the final tube and the side rail? I'm pretty sure the text-only file we use has been proofread for errors, but the wrong version of it won't do you any good. Let me know which one you have, and I'll check the bench file to see that it's been checked for errors. 73 |
|
|
|
Post by 238 on Nov 8, 2018 13:02:25 GMT -5
The ALC is by the final tube. The meter pegs to the right. I removed one wire. R51 checks ok.
|
|
|
|
Post by 238 on Nov 24, 2018 22:16:27 GMT -5
My friend called he found the switch, but i believe it is the brown one. When he brings it. I will give it a good looking over. It still has the wires on it. If it is good that might make it a little easier. 238
|
|
|
|
Post by 2600 on Nov 24, 2018 22:55:56 GMT -5
Finding a good used mode-selector switch could be like finding a good used clutch disc in the junkyard. No telling how many you'll have to go through to find a good one.
There is on lug on the front section of the mode selector, facing the bottom of the radio, with a shielded gray wire leading to it. The center-wire insulation is clear. Only the center lead of the gray shielded wire is connected to the switch lug. The rivet that holds this contact, and the two on either side of it are a common spot for the switch to first begin to break down. Any darkening of the brown plastic between the rivets either side of this lug indicates the switch has begun to break down.
If the new switch shows signs of this change in color, the breakdown of the brown insulation has already begun on that switch.
Replacing it is a lot of labor. And the risk of getting even one wire in the wrong spot is part of the picture, too. Better to see that a replacement hasn't broken down yet before investing the effort to install it.
73
|
|
|
|
Post by 238 on Nov 25, 2018 14:11:34 GMT -5
The ALC is by the final tube. The meter pegs to the right. I removed one wire. R51 checks ok an looks go. Is the text-only file for that one. If it was mine i would put a new switch in it. I know someone has tried to eliminate the sideband. They have cut the wires going to the lights. My friend said they left the wires on the switch he bought. Hopping to be able to see what they did. I do not have a MKlll to go by. Mine got lost in Indiana. 238
|
|
|
|
Post by 238 on Nov 25, 2018 17:02:56 GMT -5
Has CB Tricks site been taken down? I can not get it to load any more.
|
|
|
|
Post by 2600 on Nov 25, 2018 17:50:39 GMT -5
Yep, the whole CB Tricks server is down, along with my domain hosted there as well.
Bennie has said he'll move it to a new server, and attempt to fix the forum, both.
Just didn't say when.
73
|
|
|
|
Post by grimace on Dec 1, 2018 7:46:10 GMT -5
238 if you need a switch late me know I got nos ceramic switch ill late go
|
|
|
|
Post by 238 on Dec 29, 2018 0:02:55 GMT -5
2600 did you ever get time to look up the text-only file for the MKlll transmitter. I got a switch from grimace & fixing to install it. Not sure if they eliminated the SSB or just tried. This one has the ALC on top. 238
|
|
|
|
Post by 2600 on Dec 29, 2018 1:03:28 GMT -5
Life here at the shop got busy a few weeks back. Bought out a collection of Brownings and Trams. Been concentrating on getting them ready to sell off. Never did follow up on the 'bypass' instructions.
Replacing that switch is mostly a mechanical job, getting the wires back in the same places on the new switch as the old one.
Just one word of warning with that project. The switch is not symmetrical. If you spin it 180 degrees around from the correct position, it won't work. The contact arrangement for the new switch must look the same as the old one. Just note where the 'common' contact points are located. Those are the longer ones that touch the sliding contact at all 3 positions. They will line up at the same positions only when the new switch is turned the correct way.
If the new switch is spun 180 from the old one, nothing will work. You'll never guess how I discovered this hazard.
It's possible to unbolt the rearmost wafer of the switch and pull it away from the shaft with nearly everything still connected. A couple of short bare wires connect the front wafer to the rear one, so you'll have to clip those to get the two wafers separated. Just make sure you make a drawing or notes about where those jumper wires will go on the new one. But pulling the rear wafer away will allow you to pull the rest of the selector out of the front panel, and transfer the wires one at a time to the same spot on the front section of the new switch. Once it's bolted into the front panel, you can move the wires on the rear section of the old switch one by one to the same position on the new selector.
Not a job for the faint of heart. But still mostly a mechanical task, putting everything back where it was before you took it loose.
Best of luck with it and 73
|
|
|
|
Post by 238 on Dec 29, 2018 7:46:28 GMT -5
OK Thanks. I have learned to take a lot of pics. 238
|
|
|
|
Post by 238 on Jan 1, 2019 0:34:35 GMT -5
I got to check out the switch & make sure i got the top/bottom right before i start. The old switch he had bought still has all the wires on it. They cut them loose at the far end. An the wire colors match the ones on the switch. So it looks like they had not tried to eliminate the SSB. I see i will have to cut the shaft off. Thanks for all the help. 238
|
|
|
|
Post by grimace on Jan 15, 2019 18:58:44 GMT -5
did you get the new switch in the radio?
|
|
|
|
Post by 238 on Jan 16, 2019 1:18:14 GMT -5
I have been looking at it, but have not started yet. Been working some. Also been working on my ham4 & Maco 75. I have not quite got the top & bottom figured out that 2600 was talking about. The tab on the front is that the top or bottom? Been trying to get some other projects finished before i start on the MKlll. 238
|
|
|
|
Post by 238 on Feb 2, 2019 0:18:46 GMT -5
The receiver has worked good for about a month, but has started acting up. Some days it works ok, but then you might have it on & the receive drops out. It quits hearing & will not even respond to the spot button. Had it on all day Thursday, worked fine. Friday turned it on, in about 2 hours it lost the receive. 238
|
|
|
|
Post by tubefan on Feb 2, 2019 7:35:47 GMT -5
Have you checked the relay? When the receive drops tap the top of the relay with the handle of a screw driver lightly and see if it pops back or makes noise.
|
|
|
|
Mark lll
Feb 25, 2019 1:24:30 GMT -5
via mobile
Post by hellcat on Feb 25, 2019 1:24:30 GMT -5
Hey 2600, is there anyway you could pm me?
|
|


